This article is the first in my DIY series. I’m hoping these articles will help support my material from SPTechCon and – for those that attended, thanks for coming!!
I came across this solution during a time in which I was upset with an offshore development firm. They told me it would take an extraordinary amount of time to do an roll up web part that spanned all of the site collections in the farm and I just didn’t have that kind of time since we were on a short deadline and low on budget. Thanks to a combination of blogs and a few random ideas, I was able to put together what the client was looking for very quickly.
The first blog I came across, provided instructions on how to rollup task items across site collections using a search web part. However, I didn’t want to generate the XSLT to customize the layout, definitely not my strong suit. Now what? Then I found this article, where I learned that you can change the layout of your search core results page in MOSS 2007 without actually needing to understand XSLT. Now I just needed to combine the methods and I was all set! (Note: this method customizes search results in SharePoint 2010 too) No developers needed 🙂
I recommend trying this on a test page or in development first, then you can easily transfer the code to where you actually want the roll-up web part to display. This method can be used to roll up events, tasks, announcements, discussions, contacts, and links…pretty much anything with a keyword query! For this example, I will roll up tasks.
1. Edit your page
2. From the insert tab on the ribbon, Click Web Part and Add the Search Core Results web part (you can find it under the Search category)
3. Mouse over the arrow and select Edit Web Part
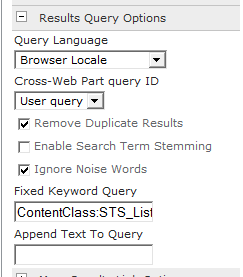
4. Go to Results Query Options, Fixed Keyword Query and add
ContentClass:STS_ListItem_Tasks
(see the end of the article for content classes for other types of roll-ups)
also make sure the Remove Duplicate Results check box is checked (it is selected by default)
5. Click OK and refresh the page. Verify your results have loaded. Note: New tasks will show once they have been crawled. The task list should look something like this.

6. Now that the roll-up is complete we need to make the text nicer. We don’t need all that extra metadata for a task list. Edit the Web Part again.
7. Under Display Properties, uncheck the box for Use Location Visualization. Select XSL Editor and an XSL box is displayed.
8. Remove all of the XSL in the box. Replace it with the following code and click Save.
<xsl:stylesheet version=”1.0″ xmlns:xsl=”http://www.w3.org/1999/XSL/Transform”>
<xsl:output method=”xml” version=”1.0″ encoding=”UTF-8″ indent=”yes”/>
<xsl:template match=”/”>
<xmp><xsl:copy-of select=”*”/></xmp>
</xsl:template>
</xsl:stylesheet>
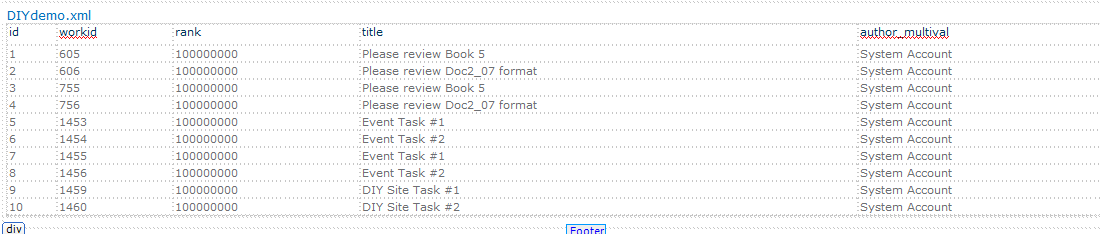
9. Click OK to Apply the changes. Refreshing the page should display code similar to the following
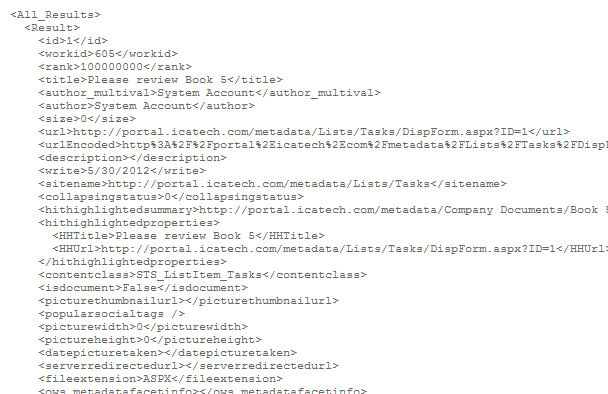
10. Highlight and copy all of this code down to the closing bracket </All_Results>. Paste it into an editor like notepad or notepad++ and save the file with the extension .xml. For example: taskresultsDIY.xml. You can save it somewhere temporary like your desktop.
11. Make sure the page is no longer in edit mode, then open SharePoint Designer and open your site.
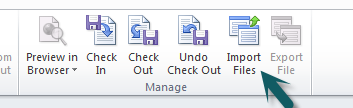
12. Go to the All Files folder in the list and click the Import Files button in the ribbon. Click Add File and choose the xml file you just created, then click OK.
13. While still in SharePoint Designer, locate your test page and edit the file. (Advanced Mode is not necessary).
14. In Design View (change views at the bottom of the screen), click inside a web part zone. I typically go directly below the search core results web part we created in the first few steps.
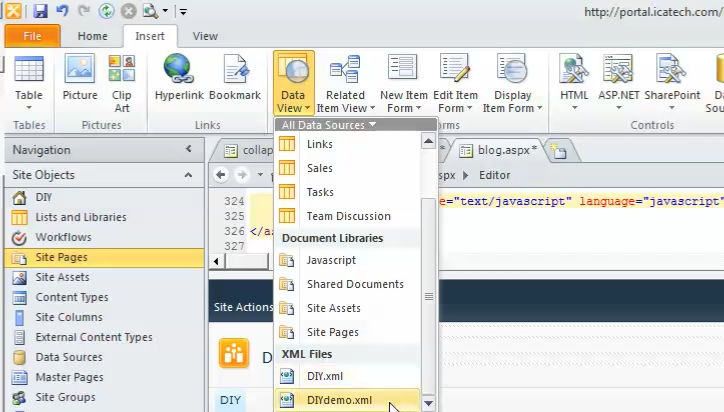
15. Click the insert tab and select Data View. Your file will be at the bottom of this drop down list. Select the file.
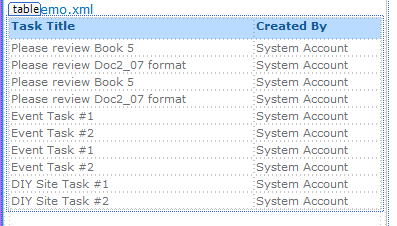
The resulting display is this:
16. At this point, you can delete columns, apply color or bold the text, etc. The Home tab in the ribbon should be displayed to see this functionality.
Additionally, the options tab can be used to filter, sort & group, or apply conditional formatting!
I am going to remove columns, rename bold the titles and reduce the width of the data view.
If additional fields are desired, you can drag and drop them in from the Data Source Details pane on the right.
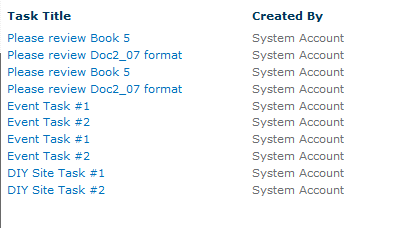
17. One critical step. We want the task title to be a hyperlink. Select one of the titles and on the ribbon select Insert, Hyperlink.
18. Text to display should be set to {title} and Address should be set to {url}. Click OK and note how the titles now show as hyperlinks.
19. Now we just need to copy the XSL from the web part. To do this, right click anywhere inside the data view and select Web Part Properties (not Properties)
20. Copy the code from the XSL Editor at the top of the window. I always paste it in Notepad for safe keeping.
21. Save your page and close it. Navigate back to your page in the browser and edit page. Remember, we can’t actually use the data view web part, its only referencing the data in the xml we exported. The next step will customize the live results we generated in the first few steps of this article.
22. Edit your original web part, that still shows the code from step 9. Edit the web part again, and open the XSL editor like we did in step 7. Clear the code that is in there and paste your newly generated code from step 20
23. Click Save for the XSL changes, then OK to apply the changes to the web part. Update the title on the web part or just hide it (set Chrome to None). Refresh the page – your cross site collection roll-up is complete!!
This XSL code can be copied to any search core results web part, just remember to set the appropriate content class!
Here are a sample of the additional content classes:
One last side note – not all columns are available in the search results view by default. I will be adding an additional blog post soon to show how to make them available. This doesn’t take any custom code, but may require your SharePoint Administrator to add a managed property.